Word for Office 365 Outlook for Office 365 Word 2016 Outlook 2016 Word 2013 More…
Adding horizontal lines, sometimes called horizontal rules, to a document or email message can help separate sections of text add visual appeal.
Insert a line by typing a few characters
The fastest way to add a horizontal line or rule is to use the AutoFormat feature. When you type certain characters three times and then press Enter, the those characters instantly become a horizontal line.
Note: AutoFormat features are not available in Office Online. If you have a desktop version of Office, click Open in [Program Name] in your desktop program to open the document and use the cropping tools. If you don’t have a desktop version of Office, you can try or buy the latest version now.
- Place the cursor where you want to insert the horizontal line.
- Do one of the following, and then press Enter:
| For this type of line: | Type three of these: |
| — (hyphens) | |
| === (equal signs) | |
| ___ (underlines) | |
| *** (asterisks) | |
| ### (number signs) | |
| ~~~ (tildes) |
The line is inserted for the full width of the page. When inserted into a column, the line is inserted to match the width of the column.
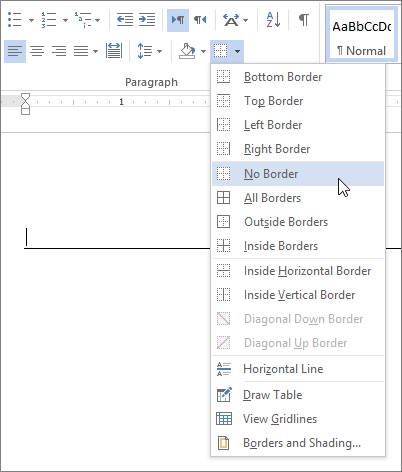
Remove a horizontal line
- Place the cursor immediately above the horizontal line.
- On the Home tab in Word or the Format Text tab in Outlook, in the Paragraph group, click the arrow next to the Borders and Shading button, and click No Border.